How to Add Custom Product Options in The Shopify Product
Here are the steps to add custom options in ScalePrint Designer & Variants :
-
How to create a Single Line Text custom option?
1. Login to ScalePrint Designer & Variants admin panel from your Shopify admin.2. Select the "Product Custom options" from the left menu.3. In the "Products" tab, click on the "Add Options" button for the product in which Single Line Text custom option needs to be added. Please note if already have other options previously added to the product then click on the "Edit Options" button.4. In the "Add Option" tab, click on the "Create new custom option" button.5. From the "Create New Custom Option" dialog, enter the title for the custom option and from field type dropdown select the "Single Line Text" option.6. Click on the save button to save & add "Single Line Text" to the product.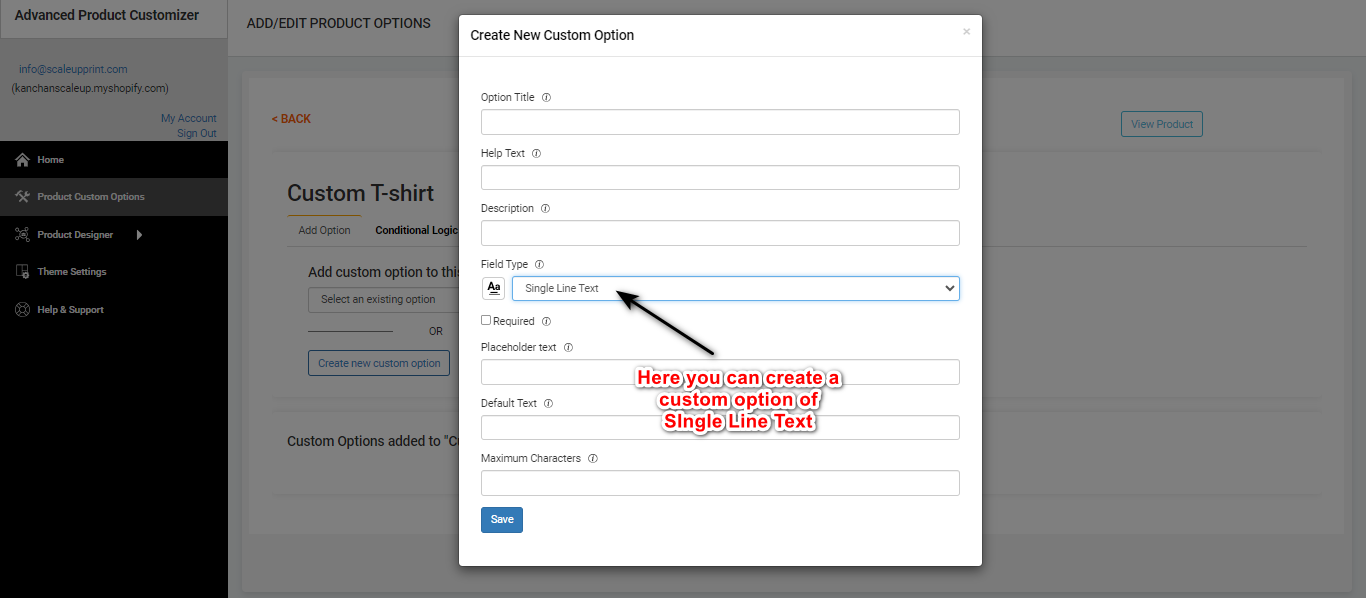 Optional Fields: Create "Single Line Text" dialog have following optional fields that you can use as per your requirements - Help text, Description, Required (To make this field as required), Placeholder text, Default Text, Maximum Characters (Limit number of characters can be added as input)
-
How to create a Paragraph Text custom option?
1. Login to ScalePrint Designer & Variants admin panel from your Shopify admin.2. Select the "Product Custom options" from the left menu.3. In the "Products" tab, click on the "Add Options" button for the product in which Paragraph custom option needs to be added. Please note if already have other options previously added to the product then click on the "Edit Options" button.4. In the "Add Option" tab, click on the "Create new custom option" button.5. From the "Create New Custom Option" dialog, enter the title for the custom option and from field type dropdown select the "Paragraph" option.6. Click on the save button to save & add "Paragraph Text" to the product.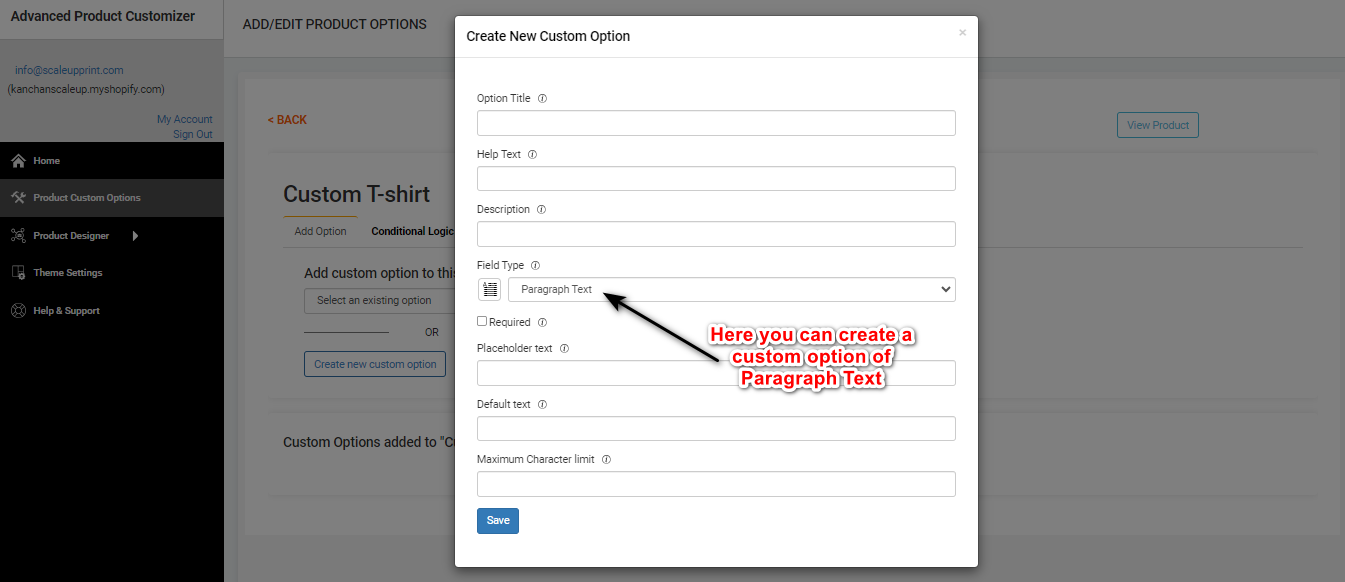 Optional Fields: Create "Paragraph Text" dialog have following optional fields that you can use as per your requirements - Help text, Description, Required (To make this field as required), Placeholder text, Default Text, Maximum Characters (Limit number of characters can be added as input).
-
How to create a File Upload custom option?
1. Login to ScalePrint Designer & Variants admin panel from your Shopify admin.2. Select the "Product Custom options" from the left menu.3. In the "Products" tab, click on the "Add Options" button for the product in which File Upload custom option needs to be added. Please note if already have other options previously added to the product then click on the "Edit Options" button.4. In the "Add Option" tab, click on the "Create new custom option" button.5. From the "Create New Custom Option" dialog, enter the title for the custom option and from field type dropdown select the "File Upload" option.6. Click on the save button to save & add "File Upload" to the product.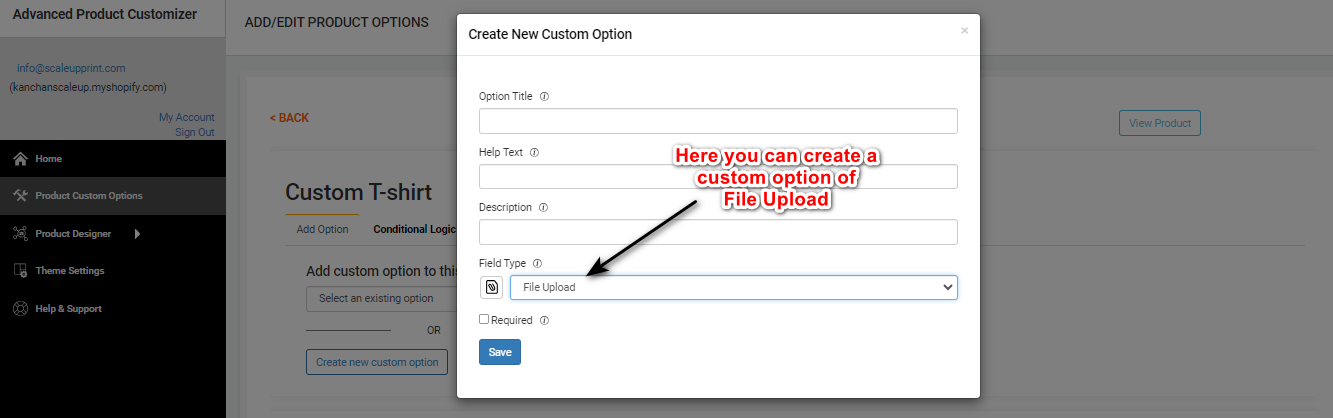 Optional fields: Create "File Upload" dialog have following following optional fields that you can use as per your requirements - Help text, Description, Required (To make this field as required)
-
How to create a Single Checkbox custom option?
1. Login to ScalePrint Designer & Variants admin panel from your Shopify admin.2. Select the "Product Custom options" from the left menu.3. In the "Products" tab, click on the "Add Options" button for the product in which Single Checkbox custom option needs to be added. Please note if already have other options previously added to the product then click on the "Edit Options" button.4. In the "Add Option" tab, click on the "Create new custom option" button.5. From the "Create New Custom Option" dialog, enter the title for the custom option and from field type dropdown select the "Single Checkbox" option.6. Click on the save button to save & add "Single Checkbox" to the product.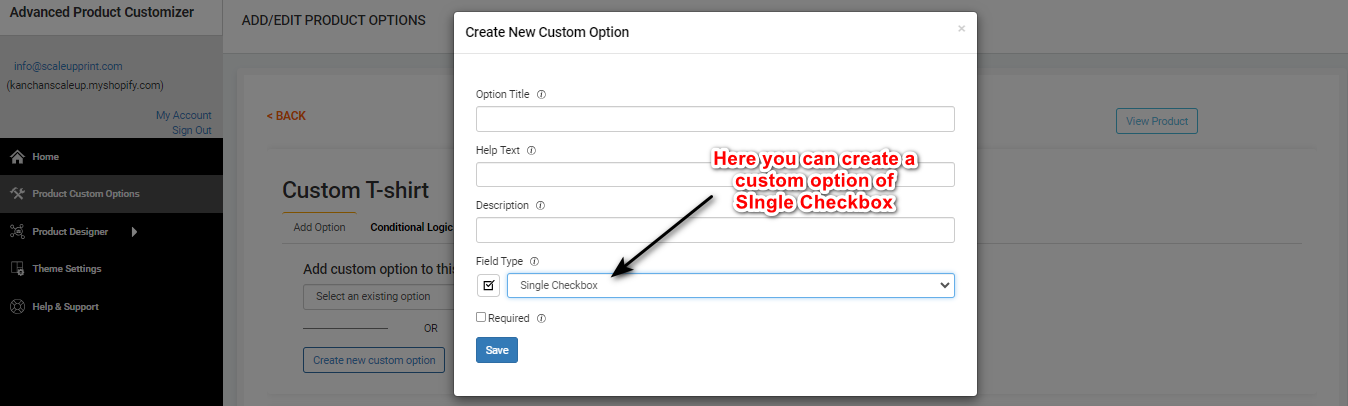 Optional fields: Create "Single Checkbox" dialog have following following optional fields that you can use as per your requirements - Help text, Description, Required (To make this field as required)
-
How to create a Checkbox Group custom option?
1. Login to ScalePrint Designer & Variants admin panel from your Shopify admin.2. Select the "Product Custom options" from the left menu.3. In the "Products" tab, click on the "Add Options" button for the product in which Checkbox Group custom option needs to be added. Please note if already have other options previously added to the product then click on the "Edit Options" button.4. In the "Add Option" tab, click on the "Create new custom option" button.5. From the "Create New Custom Option" dialog, enter the title for the custom option and from field type dropdown select the "Checkbox Group" option.Enter the text for each of the checkbox that you want to add in the "Checkbox Group" custom option. Please note, any new checkbox can be added using the "Add New Item" button.6. Click on the save button to save & add "Checkbox Group" to the product.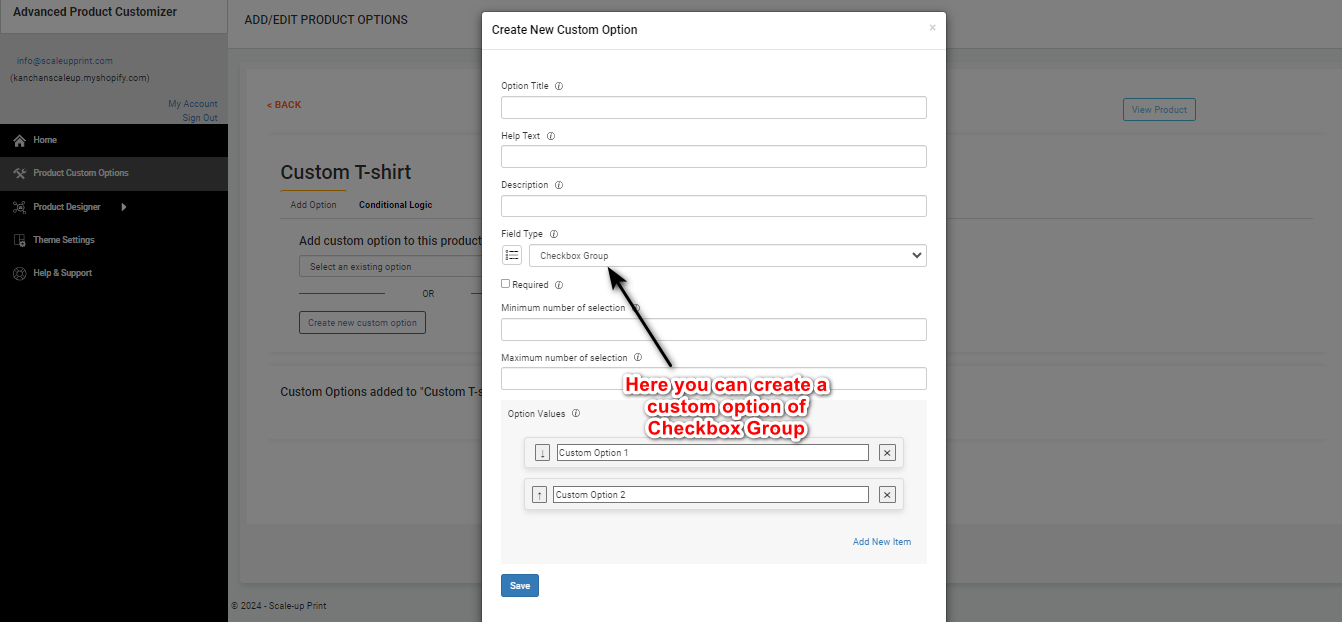 Optional fields: Create "Checkbox Group" dialog have following following optional fields that you can use as per your requirements - Help text, Description, Required (To make this field as required), Minimum number of selection (to add a condition for the user to check this much minimum checkbox), Maximum number of selection (to add a condition for the user to check maximum this much checkboxes)
-
How to create a Radio Button custom option?
1. Login to ScalePrint Designer & Variants admin panel from your Shopify admin.2. Select the "Product Custom options" from the left menu.3. In the "Products" tab, click on the "Add Options" button for the product in which Radio Button custom option needs to be added. Please note if already have other options previously added to the product then click on the "Edit Options" button.4. In the "Add Option" tab, click on the "Create new custom option" button.5. From the "Create New Custom Option" dialog, enter the title for the custom option and from field type dropdown select the "Radio Button" option.Enter the text for each of the Radio button that you want to add in the "Radio Button" custom option. Please note, any new item can be added using the "Add New Item" button.6. Click on the save button to save & add "Radio Button" to the product. Optional fields: Create "Radio Button" dialog have following optional fields that you can use as per your requirements - Help text, Description, Required (To make this field as required)
-
How to create a Date picker custom option?
1. Login to ScalePrint Designer & Variants admin panel from your Shopify admin.2. Select the "Product Custom options" from the left menu.3. In the "Products" tab, click on the "Add Options" button for the product in which Date picker custom option needs to be added. Please note if already have other options previously added to the product then click on the "Edit Options" button.4. In the "Add Option" tab, click on the "Create new custom option" button.5. From the "Create New Custom Option" dialog, enter the title for the custom option and from field type dropdown select the "Date picker" option.6. Click on the save button to save & add "Date picker" to the product.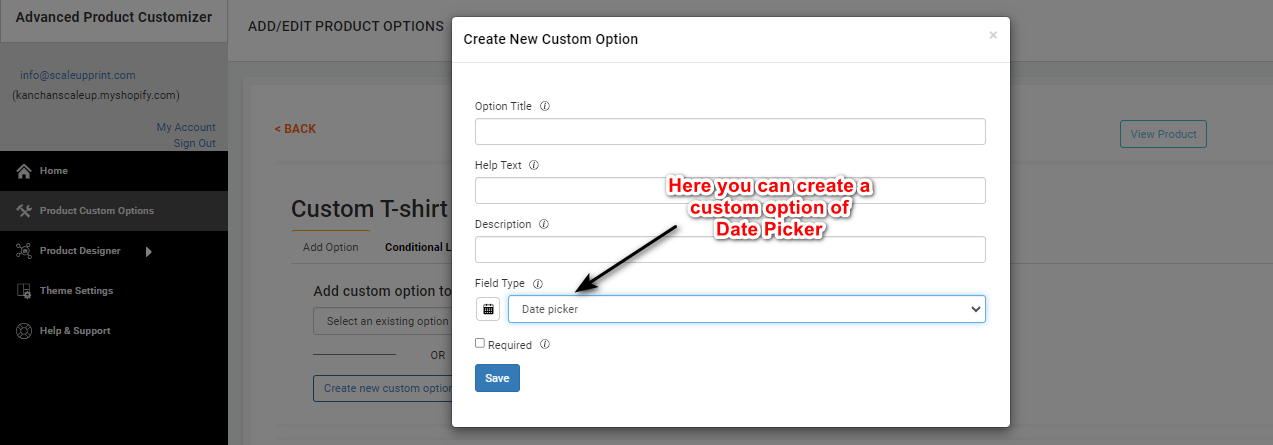 Optional fields: Create "Date picker" dialog have following optional fields that you can use as per your requirements - Help text, Description, Required (To make this field as required)
-
How to create a Color Swatch Picker custom option?
1. Login to ScalePrint Designer & Variants admin panel from your Shopify admin.2. Select the "Product Custom options" from the left menu.3. In the "Products" tab, click on the "Add Options" button for the product in which Color Swatch Picker custom option needs to be added. Please note if already have other options previously added to the product then click on the "Edit Options" button.4. In the "Add Option" tab, click on the "Create new custom option" button.5. From the "Create New Custom Option" dialog, enter the title for the custom option and from field type dropdown select the "Color Swatch Picker" option.2. Select the color for each color swatch item using the color picker control.Enter the text for each of the Color Swatch that you want to add in the "Color Swatch Picker" custom option. Please note, any new item can be added using the "Add Color Swatch Item" button.6. Click on the save button to save & add "Color Swatch Picker" to the product.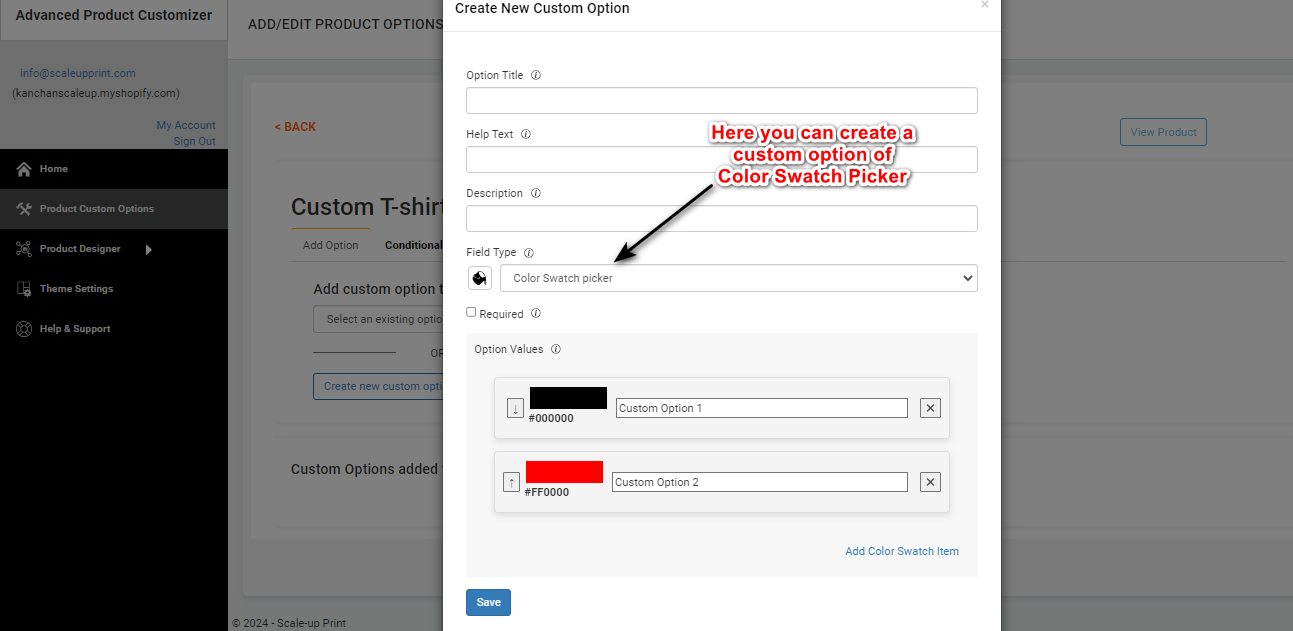 Optional fields: Create "Color Swatch Picker" dialog have following optional fields that you can use as per your requirements - Help text, Description, Required (To make this field as required)
-
How to create an Image Swatch Picker custom option?
1. Login to ScalePrint Designer & Variants admin panel from your Shopify admin.2. Select the "Product Custom options" from the left menu.3. In the "Products" tab, click on the "Add Options" button for the product in which Image Swatch Picker custom option needs to be added. Please note if already have other options previously added to the product then click on the "Edit Options" button.4. In the "Add Option" tab, click on the "Create new custom option" button.5. From the "Create New Custom Option" dialog, enter the title for the custom option and from field type dropdown select the "Image Swatch Picker" option.Upload the image for the Image Swatch item by the clicking the "Upload Swatch Image" button.Enter the text for each of the Image Swatch that you want to add in the "Image Swatch Picker" custom option. Please note, any new item can be added using the "Add Image Swatch Item" button.6. Click on the save button to save & add "Image Swatch Picker" to the product.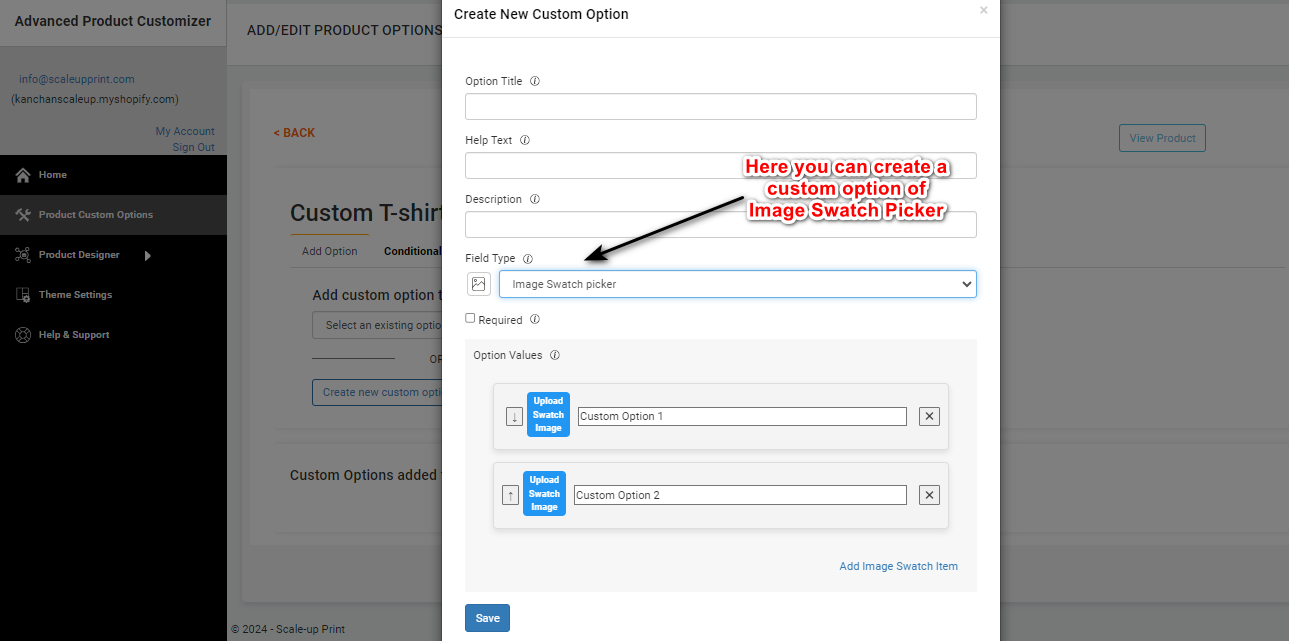 Optional fields: Create "Image Swatch Picker" dialog have following optional fields that you can use as per your requirements - Help text, Description, Required (To make this field as required)
-
How to create a Number Box custom option?
1. Login to ScalePrint Designer & Variants admin panel from your Shopify admin.2. Select the "Product Custom options" from the left menu.3. In the "Products" tab, click on the "Add Options" button for the product in which Number Box custom option needs to be added. Please note if already have other options previously added to the product then click on the "Edit Options" button.4. In the "Add Option" tab, click on the "Create new custom option" button.5. From the "Create New Custom Option" dialog, enter the title for the custom option and from field type dropdown select the "Number Box" option.6. Click on the save button to save & add "Number Box" to the product.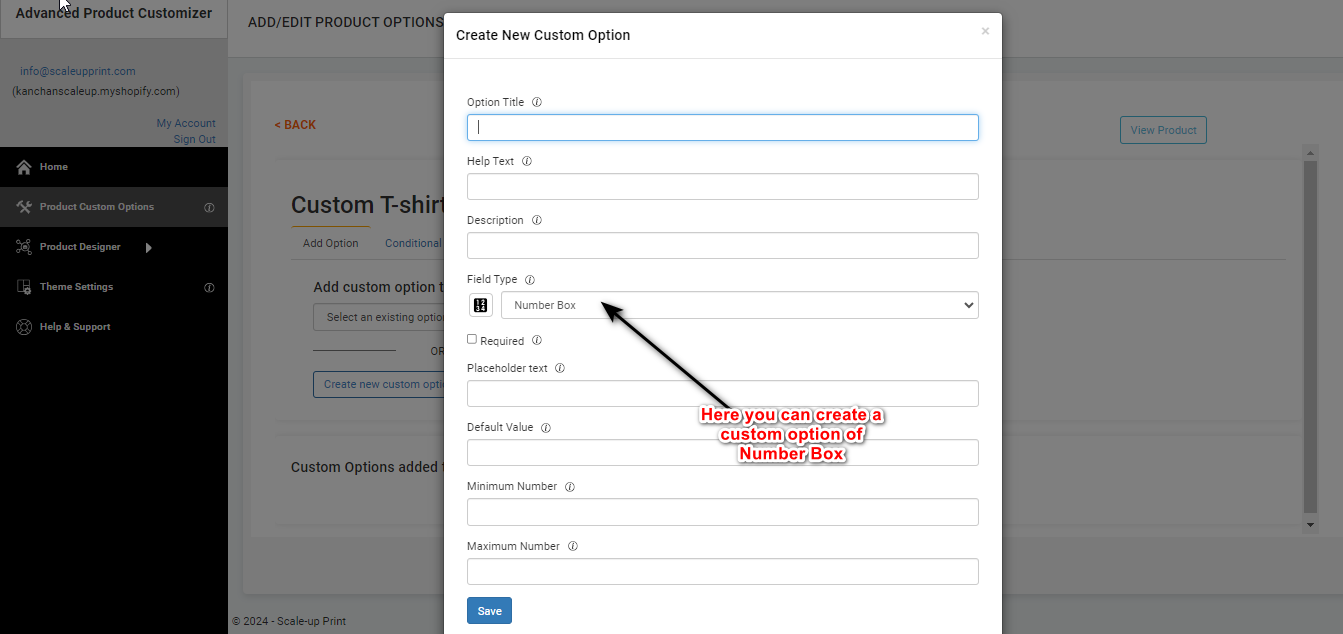 Optional Fields: Create "Number Box" dialog have following optional fields that you can use as per your requirements - Help text, Description, Required (To make this field as required), Placeholder text, Default Text, Maximum Characters (Limit number of characters can be added as input)
-
How to create a Dropdown custom option?
1. Login to ScalePrint Designer & Variants admin panel from your Shopify admin.2. Select the "Product Custom options" from the left menu.3. In the "Products" tab, click on the "Add Options" button for the product in which Dropdown custom option needs to be added. Please note if already have other options previously added to the product then click on the "Edit Options" button.4. In the "Add Option" tab, click on the "Create new custom option" button.5. From the "Create New Custom Option" dialog, enter the title for the custom option and from field type dropdown select the "Dropdown" option.Enter the text for each of the items that you want to add in the "Dropdown" custom option. Please note, any new item can be added using the "Add New Item" button.6. Click on the save button to save & add "Dropdown" to the product.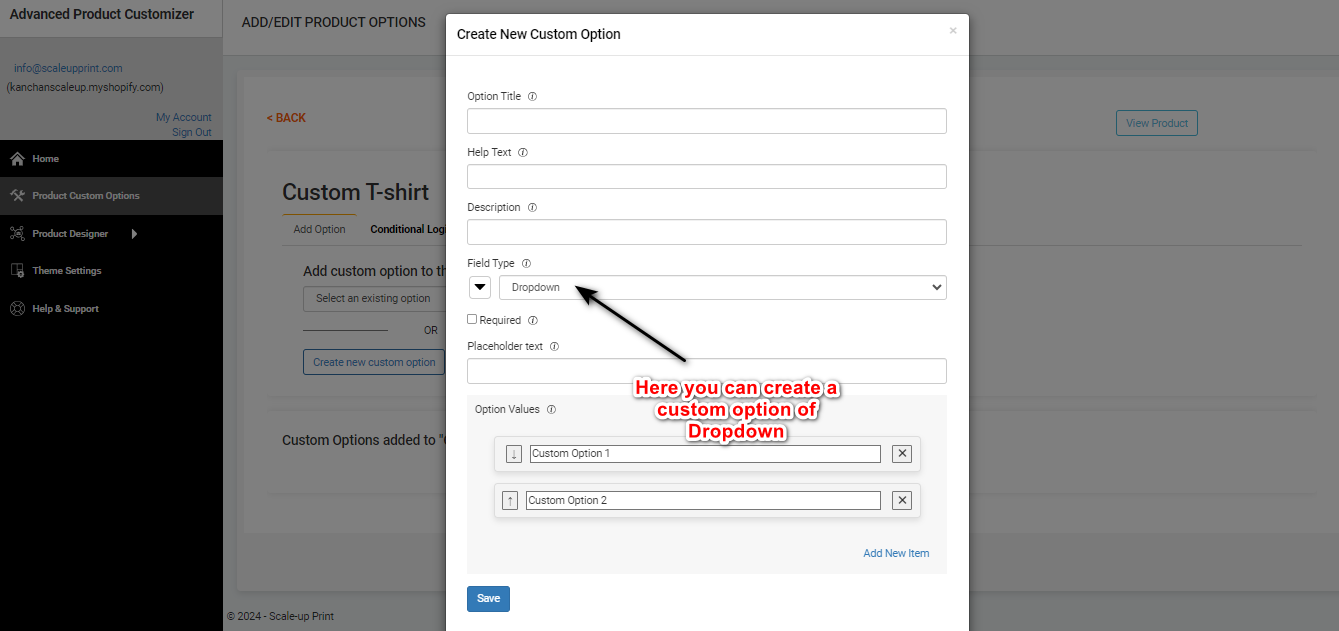 Optional Fields: Create "Dropdown" dialog have following optional fields that you can use as per your requirements - Help text, Description, Required (To make this field as required), Placeholder text.
-
How to create a HTML custom option?
1. Login to ScalePrint Designer & Variants admin panel from your Shopify admin.2. Select the "Product Custom options" from the left menu.3. In the "Products" tab, click on the "Add Options" button for the product in which HTML custom option needs to be added. Please note if already have other options previously added to the product then click on the "Edit Options" button.4. In the "Add Option" tab, click on the "Create new custom option" button.5. From the "Create New Custom Option" dialog, enter the title for the custom option and from field type dropdown select the "HTML" option.6. Click on the save button to save & add "HTML" to the product.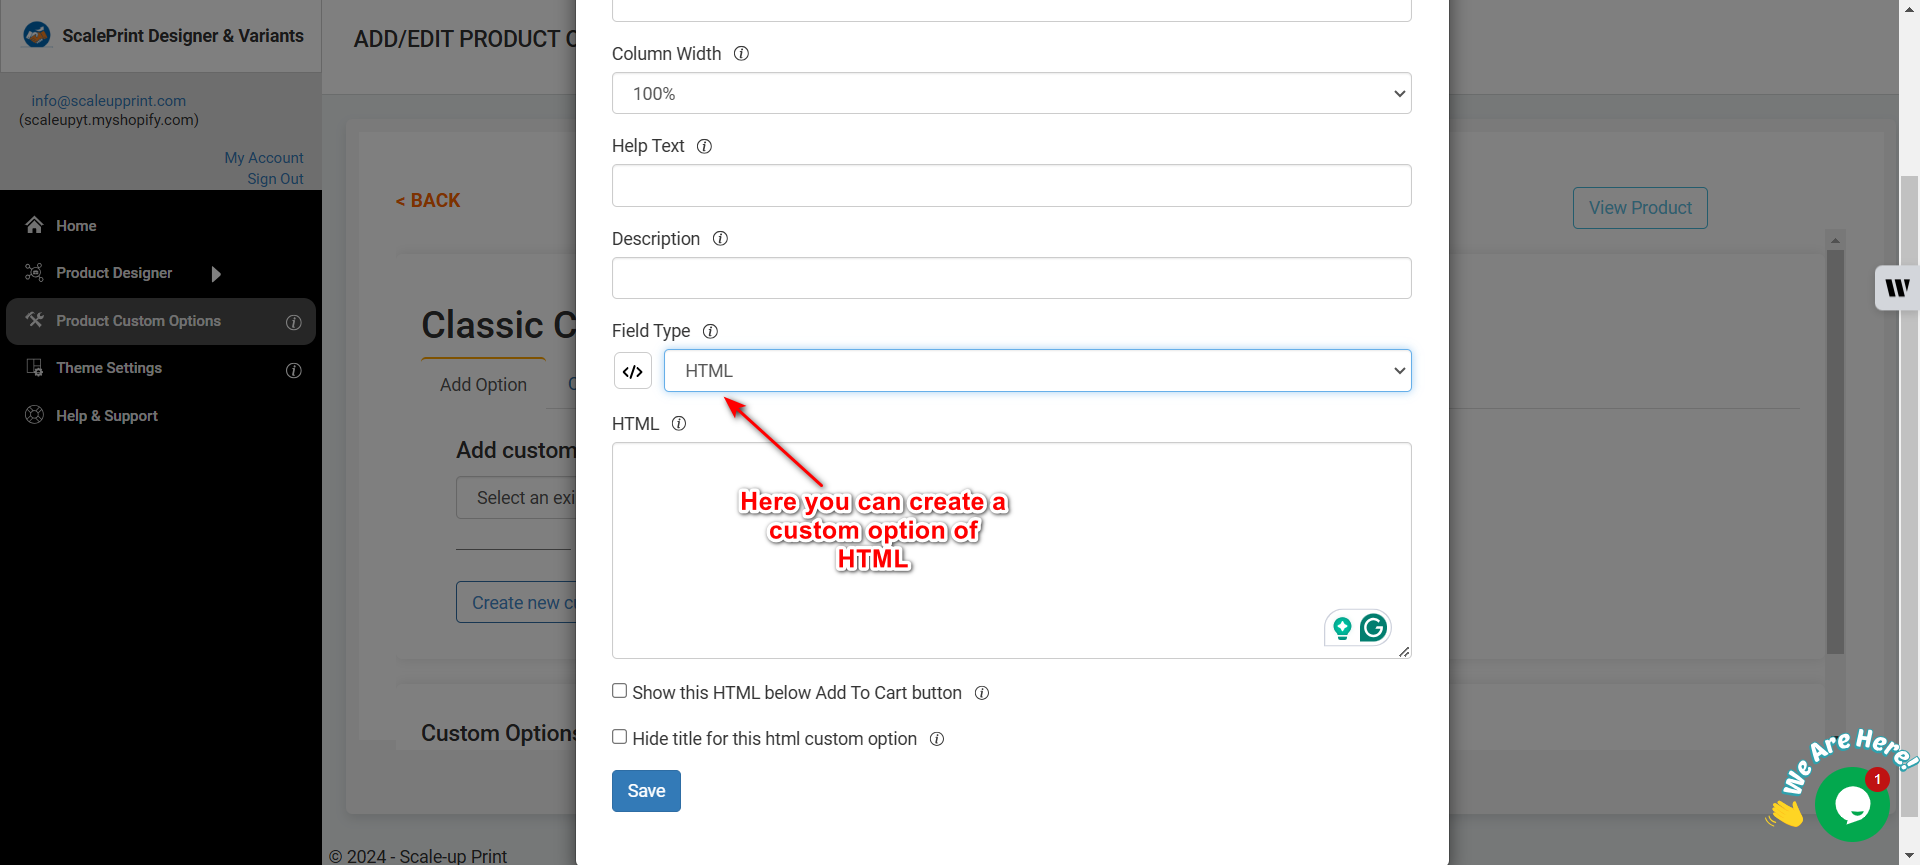 Optional Fields: Create "HTML" dialog have following optional fields that you can use as per your requirements - Help text, Description, Required (To make this field as required), Placeholder text, Default Text, Maximum Characters (Limit number of characters can be added as input)
-
How to create a Email custom option?
1. Login to ScalePrint Designer & Variants admin panel from your Shopify admin.2. Select the "Product Custom options" from the left menu.3. In the "Products" tab, click on the "Add Options" button for the product in which Email custom option needs to be added. Please note if already have other options previously added to the product then click on the "Edit Options" button.4. In the "Add Option" tab, click on the "Create new custom option" button.5. From the "Create New Custom Option" dialog, enter the title for the custom option and from field type dropdown select the "Email" option.6. Click on the save button to save & add "Email" to the product.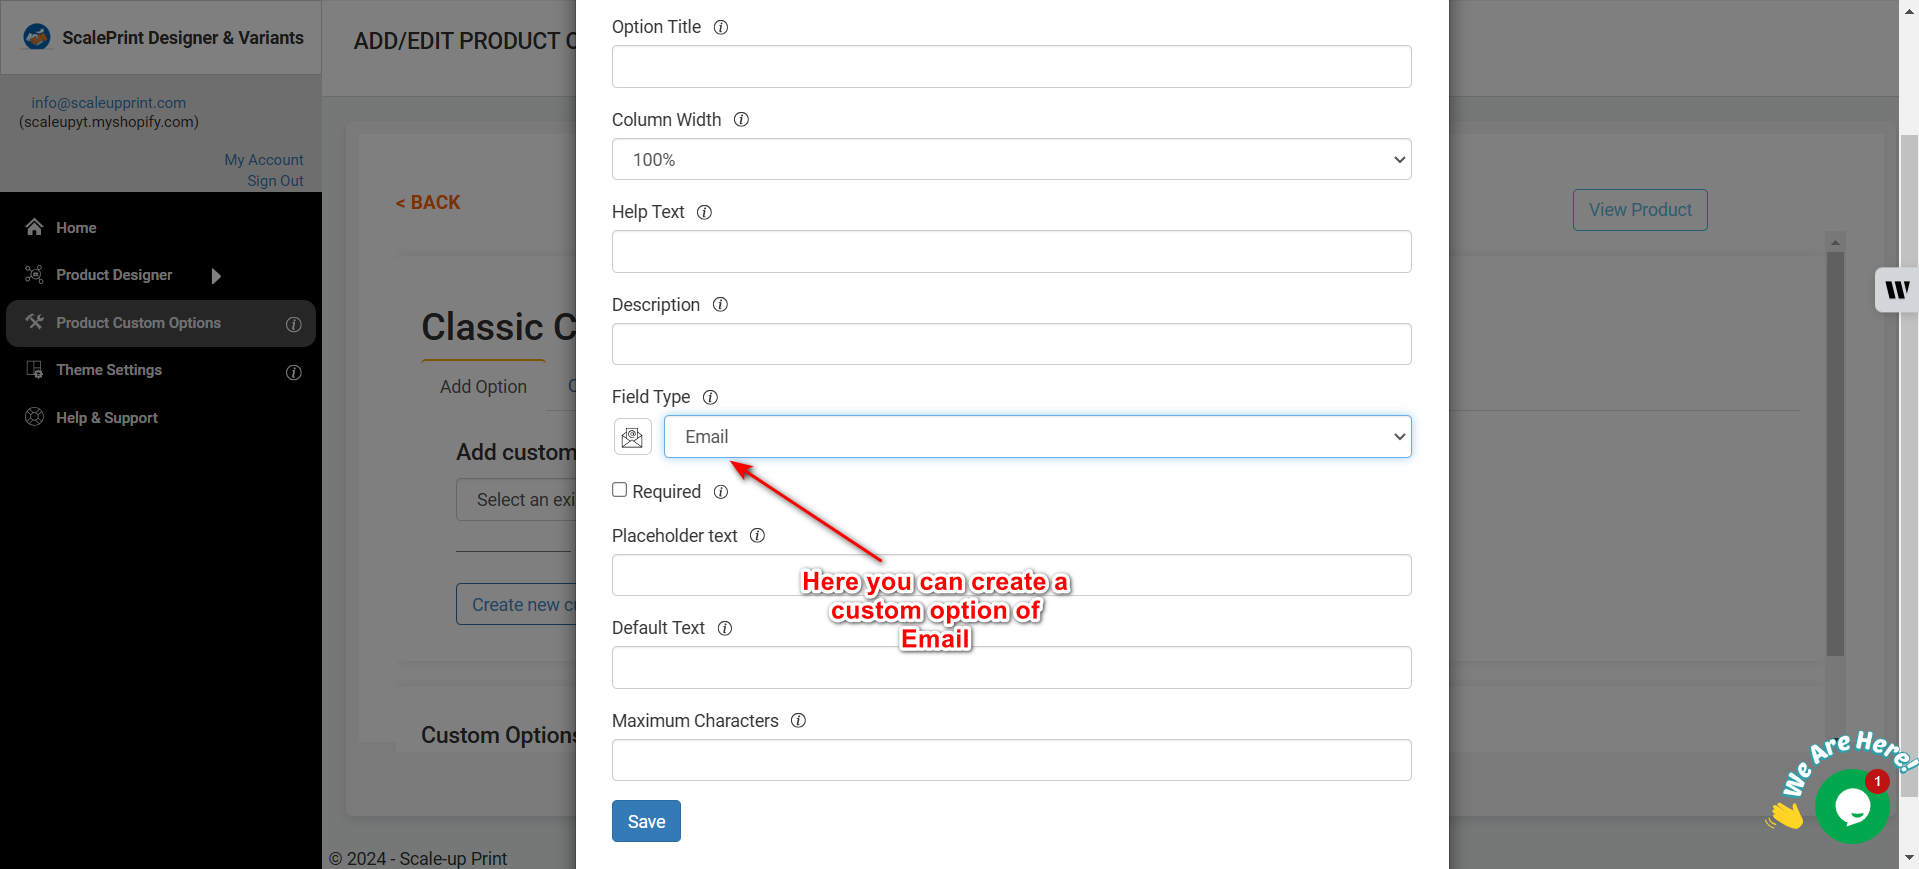 Optional Fields: Create "Email" dialog have following optional fields that you can use as per your requirements - Help text, Description, Required (To make this field as required), Placeholder text, Default Text, Maximum Characters (Limit number of characters can be added as input)
-
How to create a Color Picker custom option?
1. Login to ScalePrint Designer & Variants admin panel from your Shopify admin.2. Select the "Product Custom options" from the left menu.3. In the "Products" tab, click on the "Add Options" button for the product in which Color Picker custom option needs to be added. Please note if already have other options previously added to the product then click on the "Edit Options" button.4. In the "Add Option" tab, click on the "Create new custom option" button.5. From the "Create New Custom Option" dialog, enter the title for the custom option and from field type dropdown select the "Color Picker" option.6. Click on the save button to save & add "Color Picker" to the product.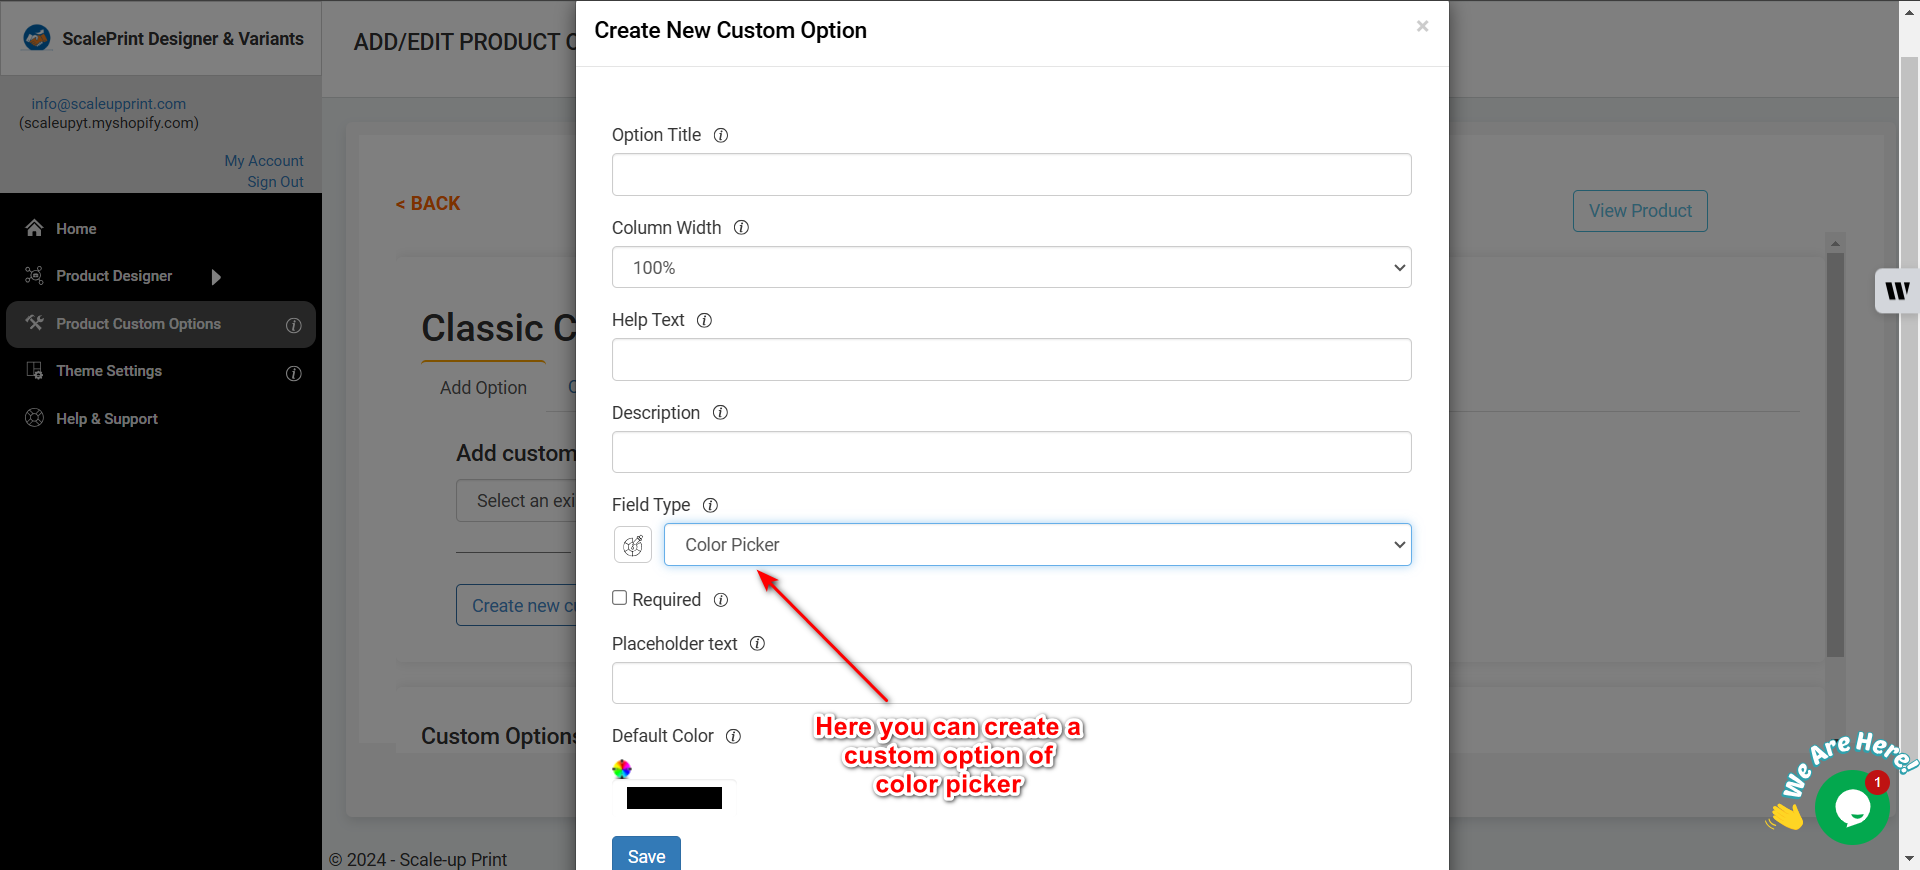 Optional Fields: Create "Color Picker" dialog have following optional fields that you can use as per your requirements - Help text, Description, Required (To make this field as required), Placeholder text, Default Text, Maximum Characters (Limit number of characters can be added as input)
-
How to create a Button custom option?
1. Login to ScalePrint Designer & Variants admin panel from your Shopify admin.2. Select the "Product Custom options" from the left menu.3. In the "Products" tab, click on the "Add Options" button for the product in which Button custom option needs to be added. Please note if already have other options previously added to the product then click on the "Edit Options" button.4. In the "Add Option" tab, click on the "Create new custom option" button.5. From the "Create New Custom Option" dialog, enter the title for the custom option and from field type dropdown select the "Button" option.6. Click on the save button to save & add "Button" to the product.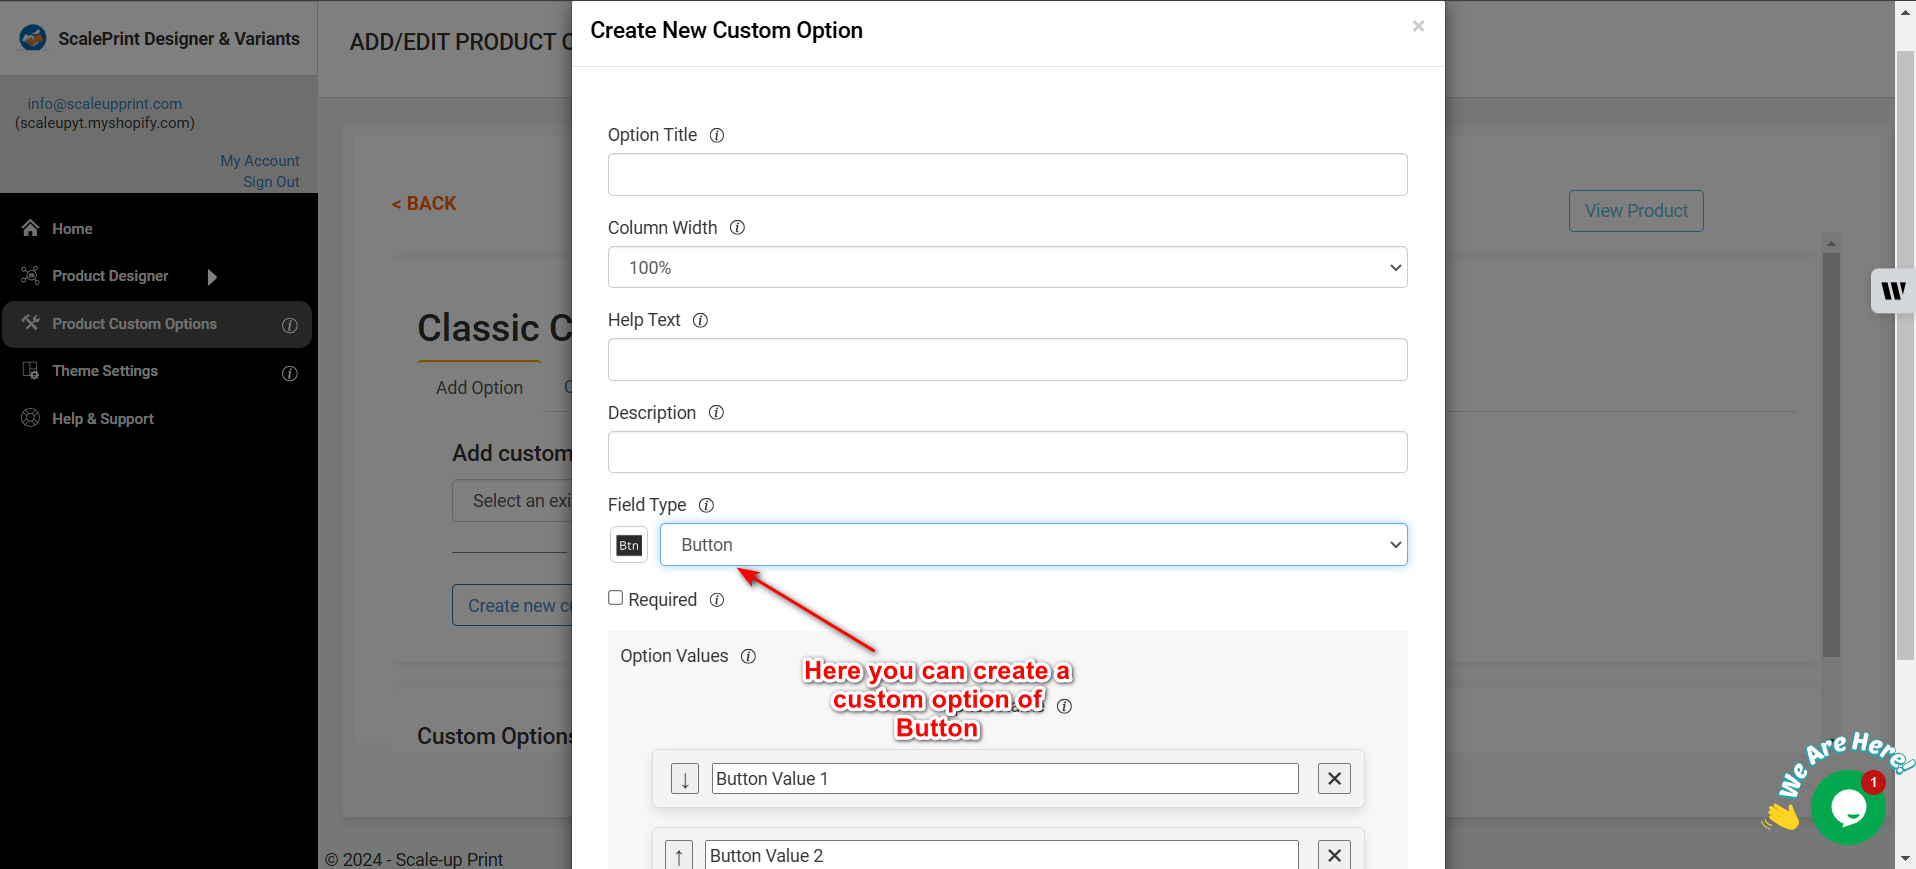 Optional Fields: Create "Button" dialog have following optional fields that you can use as per your requirements - Help text, Description, Required (To make this field as required), Placeholder text, Default Text, Maximum Characters (Limit number of characters can be added as input)
-
How to create a Font Picker custom option?
1. Login to ScalePrint Designer & Variants admin panel from your Shopify admin.2. Select the "Product Custom options" from the left menu.3. In the "Products" tab, click on the "Add Options" button for the product in which Font Picker custom option needs to be added. Please note if already have other options previously added to the product then click on the "Edit Options" button.4. In the "Add Option" tab, click on the "Create new custom option" button.5. From the "Create New Custom Option" dialog, enter the title for the custom option and from field type dropdown select the "Font Picker" option.6. Click on the save button to save & add "Font Picker" to the product.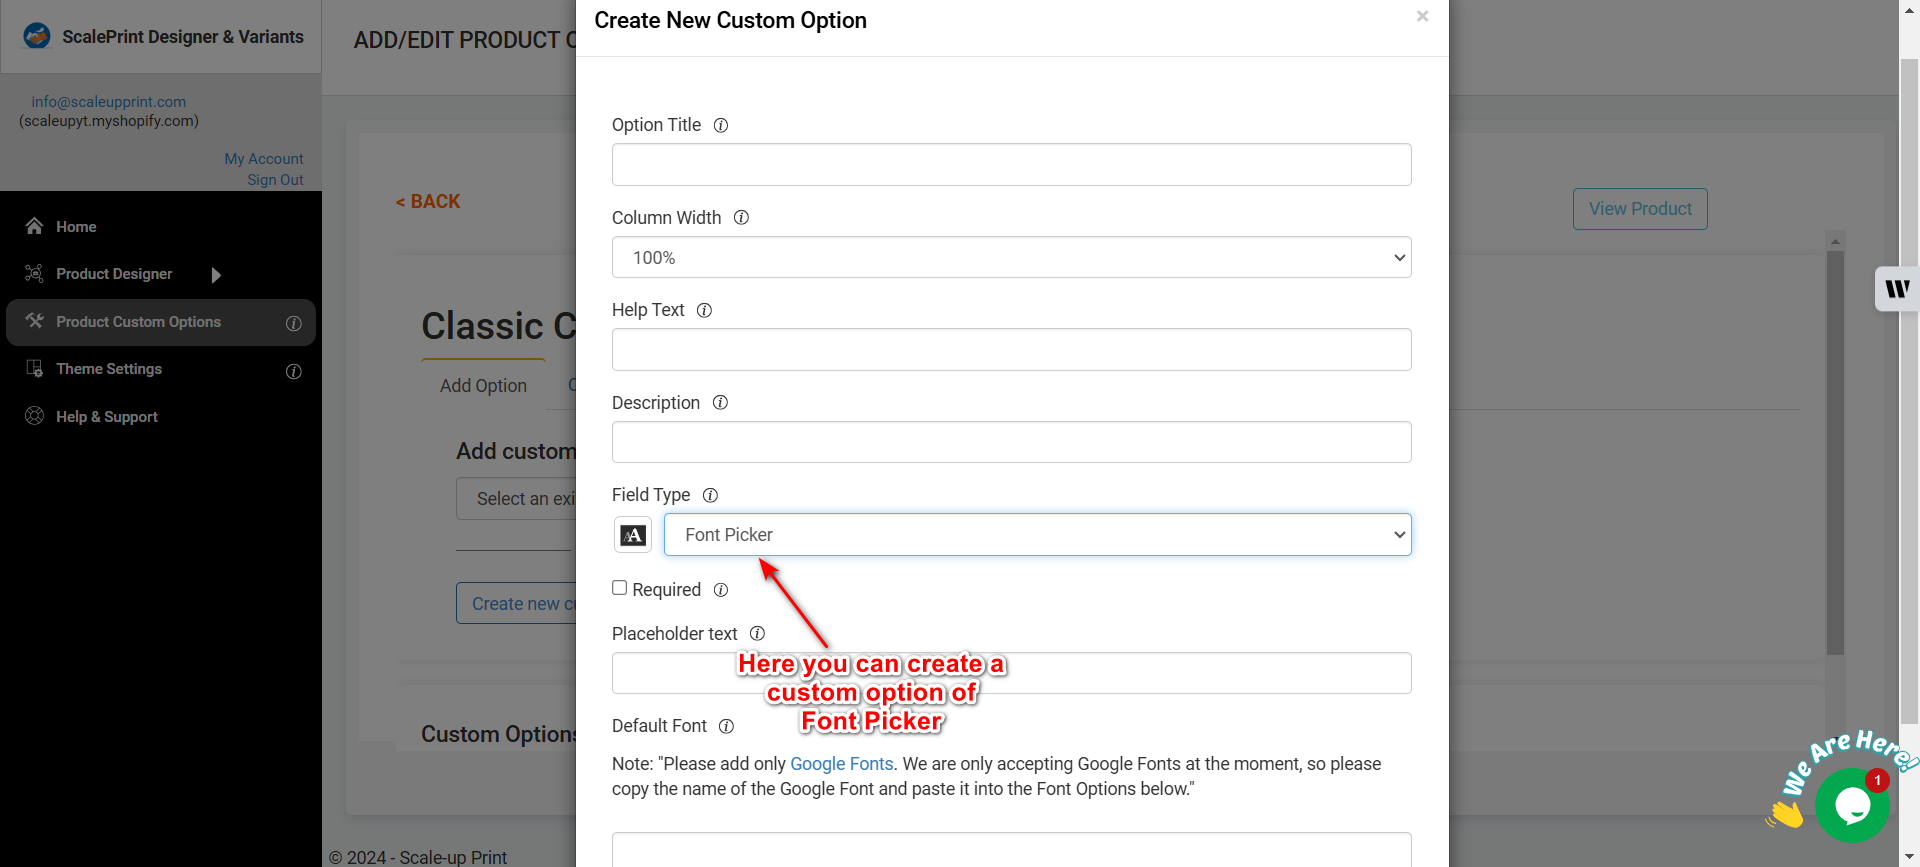 Optional Fields: Create "Font Picker" dialog have following optional fields that you can use as per your requirements - Help text, Description, Required (To make this field as required), Placeholder text, Default Text, Maximum Characters (Limit number of characters can be added as input)
-
How to create a Divider custom option?
1. Login to ScalePrint Designer & Variants admin panel from your Shopify admin.2. Select the "Product Custom options" from the left menu.3. In the "Products" tab, click on the "Add Options" button for the product in which Divider custom option needs to be added. Please note if already have other options previously added to the product then click on the "Edit Options" button.4. In the "Add Option" tab, click on the "Create new custom option" button.5. From the "Create New Custom Option" dialog, enter the title for the custom option and from field type dropdown select the "Divider" option.6. Click on the save button to save & add "Divider" to the product.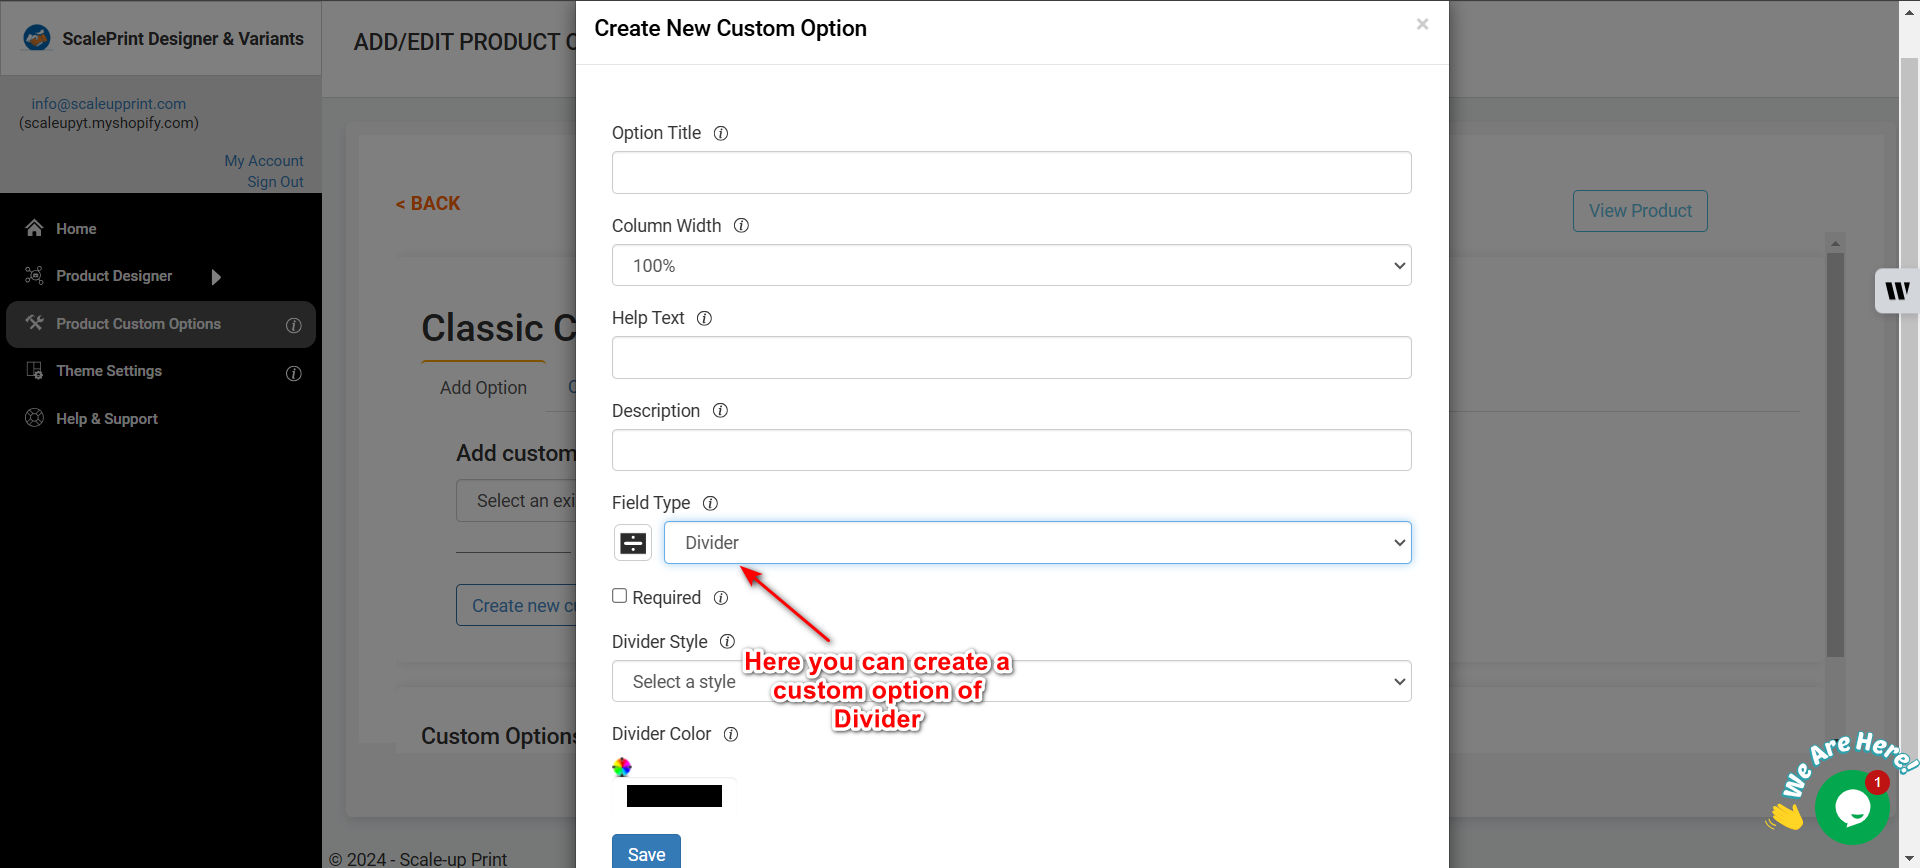 Optional Fields: Create "Divider" dialog have following optional fields that you can use as per your requirements - Help text, Description, Required (To make this field as required), Placeholder text, Default Text, Maximum Characters (Limit number of characters can be added as input)